How to Turn a Drawing Into a 3D Collectible
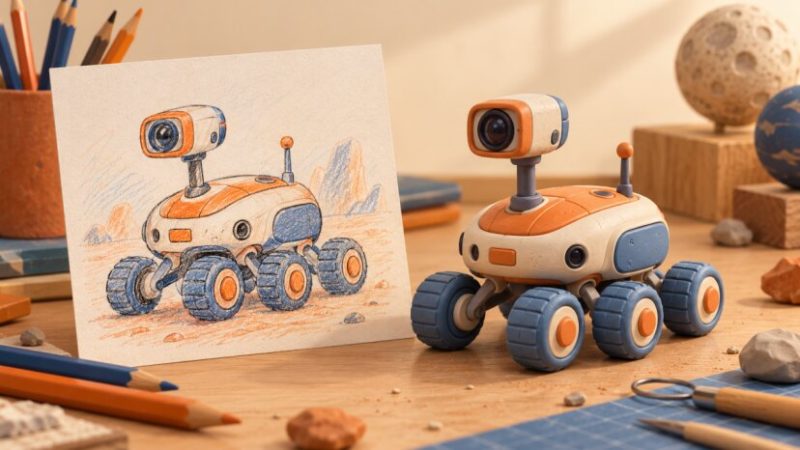
A small rover drawn on paper can have plenty of personality, even before it has a back or an underside. N4D provides a way to develop that drawing into a 2D image to 3D model collectible. The enjoyable part is seeing which features survive the move into volume and deciding how the rest of the object should look.
For a first attempt, aim for a digital collectible you can rotate and inspect. Printing can come later if you want a physical version. Starting with a modest goal makes it easier to learn what the picture communicates and where the design needs more thought.
Pick a subject with a readable shape
An original toy rover makes a useful beginner project. It can have a rounded body, chunky wheels and a short camera mast. Those large shapes give you clear features to compare when you look at the result.
Avoid making the first design depend on tiny lettering, delicate antenna wires or a complicated mechanism. Small features are harder to judge and may require more editing than the main body. You can add detail after the overall design works.
Choose a drawing you created or have permission to use. Keep the first experiment focused on one subject, rather than a whole scene filled with vehicles and scenery. A single object gives you a much clearer idea of what the generation process has done.
Give the image a little preparation
Photograph or scan the drawing so that its outline is easy to see. Use even light and avoid a strong shadow from your phone falling across the paper. Crop away the desk and unrelated sketches while leaving a small margin around the object.
If the drawing shows several views, select one clear view for a single image experiment. A three quarter view can show the front, roof and one side of the rover together. Make sure that wheels or other important parts have not been cut off by the edge of the picture.
Colour can communicate design choices, but the drawing should still make sense without it. Check whether the mast is clearly separated from the body and whether the wheels have distinct outlines. Stronger structural cues make your intended object easier to interpret.
Generate a version and keep the reference
Upload the prepared drawing to the image to 3D collectible. In N4D, texture options are available as part of the workflow. Choose them according to whether you want to explore the rover’s coloured appearance or concentrate first on its shape.
Keep the source drawing open beside the result. Start with the large features: the size of the body relative to the wheels, the height of the mast and the position of the camera. Decide whether the model still has the character that made the drawing appealing.
Treat the first result as a version of your idea that you can develop. A feature may be simplified or interpreted differently. Write down the few changes that matter most before deciding whether to adjust the reference, generate another version or edit the model in a suitable 3D application.
Explore the parts the drawing did not show
A picture shows an object from a particular viewpoint. When you rotate a generated model, you also see surfaces that the picture never described. Those surfaces deserve some deliberate design decisions of their own.
Give the rear a plausible design
Look at the back of the rover and ask whether it belongs to the same object. You might want a simple rear panel or a small bumper. There is no hidden photograph for the tool to recover from an original imaginary drawing, so your judgement determines whether the proposed shape fits.
Check how the object meets the ground
Inspect the underside and the wheel positions. The model may look convincing from above while its lower surfaces need attention. For a shelf collectible, decide whether you want a freestanding object or an attached display base. Moving wheels would require a separate mechanical design.
Decide how you want to share the result
For a digital project, choose a model format supported by your intended viewer or editing software. Open the exported file there before sending it to someone else. Confirm that the object appears and, if you use textures, that its appearance has transferred as expected.
A few still images can also tell the story well. Place the original drawing beside views of the model and explain what you changed. If you share generated concept illustrations, identify them as illustrations so readers can distinguish them from captures of the actual model.
Keep the model and its accompanying files together. Descriptive filenames help when you return to the project later, especially if you have saved several variations of the same rover.
Prepare separately for a physical print
A model that looks good on screen still needs preparation for printing. Inspect the geometry, set the intended physical size and check whether small parts are thick enough for the chosen process. A texture that depicts a panel does not necessarily create a raised or recessed feature in the printed surface.
Use your slicer’s preview to examine the proposed print, including supports and contact with the build surface. Begin with a manageable size and ask an experienced printer operator for help if you are unsure about the setup. A first print can reveal details that you want to simplify in the next version.
The project can remain entirely digital and still be worthwhile. You have taken a design beyond its original viewpoint and made decisions about its complete form. With N4D as a starting point, that small drawing can become a 3D collectible you continue to refine, display and share.
Would you like to receive similar articles by email?

Paul Tomaszewski
Paul Tomaszewski is a science & tech writer as well as a programmer and entrepreneur. He is the founder and editor-in-chief of CosmoBC. He has a degree in computer science from John Abbott College, a bachelor's degree in technology from the Memorial University of Newfoundland, and completed some business and economics classes at Concordia University in Montreal. While in college he was the vice-president of the Astronomy Club. In his spare time he is an amateur astronomer and enjoys reading or watching science-fiction. You can follow him on LinkedIn and Twitter.

You May Also Like

How Art Museums Preserve and Protect Their Pieces

Is Squirrel Girl The Most Powerful Superhero In The Marvel Universe?