Safely Observe Solar Prominences, Filaments, and Flares
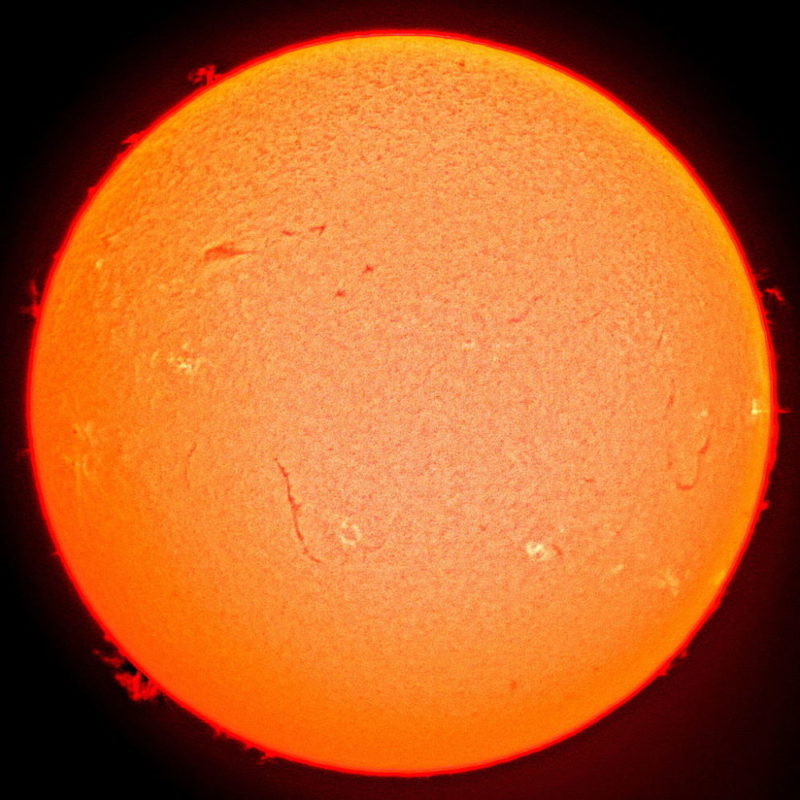
Two things set the Sun apart from all other stars in the Universe: it does not belong to any constellation, and it is close enough to Earth to be observed and studied in exquisite detail with nothing more than modest amateur equipment, which equipment includes smartphones. Consider the image below; it was made from a video taken with a web cam attached to a small, dedicated solar telescope as opposed to a smartphone, and it shows almost everything that can occur on the Sun simultaneously—in a single image. It’s possible to safely observe solar prominences, filaments, and flares like these with proper equipment and filters.
The white plumes on the solar limb are solar flares silhouetted against the dark background, the black spots are sunspots that are about 2000 K cooler than the surrounding area, and the grainy surface is the result of convection currents rising from the Sun’s inner layers. If you are interested in observing these features for yourself, read on, and we’ll tell you how to go about it, starting with some advice on preserving your eyesight and avoiding dangerous sun rays.
Would you like to be notified of stargazing events?
Use only approved solar filter material
If you are going to safely observe features like solar eclipses, solar prominences, filaments, flares, sunspots, and coronal mass ejections (CMEs, which are not visible through backyard telescopes), you obviously need to look at the Sun directly through a filtered telescope—but there is a right way and a wrong way to do this.
If you do not own a dedicated telescope that filters out more than 99% of the Sun’s light, the wrong way to observe the Sun is not to use approved solar filter material over the telescope aperture, or to use filters that are designed for viewing objects other than the Sun.
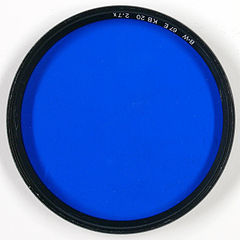
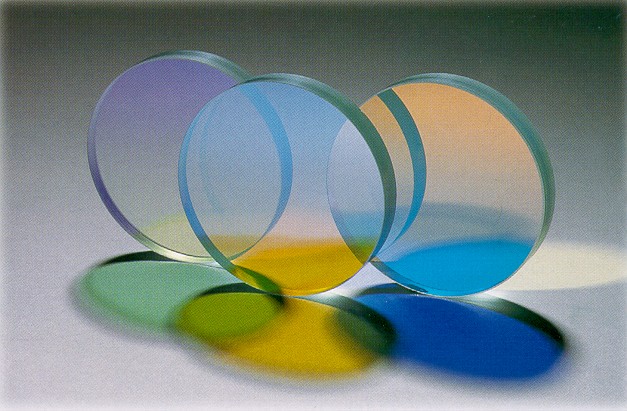
The images above show a selection of purpose-made solar filters made from various materials. The first one shows the Mylar film that forms the filter material, while the other ones to the rear are made from coated glass that only transmit light in very narrow bands in the Hydrogen Alpha and Calcium-K lines at wavelengths of 656.3 nanometers, and 393.3 nanometers respectively.
With a few exceptions, such as Baader Planetarium and specialized sodium filters, these are the only light frequencies that are safe for observing the Sun, but note that different filters produce different views of the solar disc. Be sure the filter is certified to meet the ISO 12312-2 safety standard.
The differences arise from the fact that different features of the Sun have different temperatures, and therefore emit light and other forms of energy at different frequencies. Thus, by switching between filters, different features of the Sun can be accentuated, such as the fine detail in this monochrome image of a pair of sunspots taken through a Mylar film filter that is available online, and/or from specialist dealers in astronomical equipment. These filters allow you to safely observe solar prominences, filaments, and flares in different wavelengths of light.
Observing the Sun with a smartphone
While dedicated solar telescopes can provide stunning views of the Sun, any view can be greatly enhanced by taking a picture of it, since cameras capture light and therefore detail, in ways that human vision cannot.
Although using your smartphone to take a picture of the Sun directly will not harm the phone, we do not recommend that you use your phone this way under any circumstances. It is too easy to look at the Sun directly during the process, which if it happens, can severely damage or even destroy your eyesight in less than a second!
The better option is to attach your smartphone to your telescope eyepiece with an adapter that allows you to take short video clips that can be manipulated into a single image later. Many smartphones now include astrophotography or “pro” modes that allow for more precise control over focus, ISO, and exposure—useful features for solar imaging.
The best part of this approach is that if you have a telescope (even a small spotting scope will do), all you need is a suitable solar filter to begin observing. You don’t necessarily have to take pictures, but with the phone attached to the eyepiece, you will get stunning views that can be saved for viewing later. However, the quality of the phone camera, as well as the aperture of the telescope plays a crucial role in how well the images turn out.
The problem with viewing the Sun, even with suitable filters, is that it is very bright and although some filters block out close to 99.5% of the Sun’s light, the remaining 0.5% can be more than enough to overwhelm the phone cameras’ CMOS light sensors; especially if the telescope’s aperture is larger than 100 mm. That said, newer phones often handle high brightness better than older models, thanks to improved HDR and dynamic range capabilities.
This is the primary reason why dedicated solar telescopes rarely have apertures larger than 70 mm or so, to limit the amount of light that enters the instrument. If your telescope is larger than this, simply make a mask to fit over the aperture with cardboard (or other suitable material) that is taped down to prevent it falling off the end of the telescope.
Cut a hole of about 3 to 4 inches in the mask, and (securely!) tape a suitable filter over the hole, but make sure that the hole clears the secondary mirror if you have a reflecting instrument. Also, replace your finder scope with a solar-safe finder or use a shadow-based Sun finder instead, to avoid any chance of eye injury.
The mask effectively reduces the telescopes’ light gathering ability to levels that are unlikely to overwhelm your phones’ camera. Next, attach the adapter to the telescope, and secure the phone in the adapter with the camera centered over the eyepiece. Pointing the telescope toward the Sun is easy without a finder scope; simply point the instrument towards the Sun until you get the smallest shadow profile behind the scope.
At this point, the telescope will be pointing straight at the Sun, but if the image is not centered on the phone screen, simply adjust the phone and/or adapter until the image is where you want it on the screen. However, to prevent damage to your eyes, take extreme care during the adjustment process not to allow light from the eyepiece to enter your eyes. The safest option is to move the telescope away from the Sun, make an adjustment, and realign the scope with the Sun repeatedly until you are satisfied with the image produced on the screen.
One more thing
Depending on the filter used on the telescope, it may be necessary to make adjustments to your smartphone cameras’ focus and other settings to capture some solar features successfully. There is no single setting, or combination of settings that works best on all, or even most applications, which means that getting the best results depends entirely on experimenting with your particular equipment and setup. Experimenting with smartphone astrophotography apps or advanced manual settings can also help capture details like granulation or limb darkening more effectively.
Would you like to receive similar articles by email?
Paul Tomaszewski
Paul Tomaszewski is a science & tech writer as well as a programmer and entrepreneur. He is the founder and editor-in-chief of CosmoBC. He has a degree in computer science from John Abbott College, a bachelor's degree in technology from the Memorial University of Newfoundland, and completed some business and economics classes at Concordia University in Montreal. While in college he was the vice-president of the Astronomy Club. In his spare time he is an amateur astronomer and enjoys reading or watching science-fiction. You can follow him on LinkedIn and Twitter.


You May Also Like

What Is the Hubble Volume?
Stargazing Calendar for October 2025